A Sharp Blade

I was visiting Seattle one spring, to escape the inevitable mud and snow of Bozeman and remember what green things looked like, when I walked into a small shop that sold Japanese saws. There was nothing on display, just boxes stacked in the back of the room and a counter with an older Japanese gentleman standing behind it.  I had heard he had a particular type of Japanese saw that I was looking for and inquired about it.

“Yes, I’ve got one”, raising an eyebrow, “but it is not the best, you want to see the best.”

“Sure, I’ll look at it, but show me the one I asked for too.”

He reaches under the counter and pulls out an menagerie of blades, handles and some wood to demonstrate on.

He examined me as he handed me the saw I had asked him about, “you know how to use it properly?”

I took the saw and the piece of wood and started to cut.

“No, like this” and he took another saw to demonstrate a better stroke along with an explanation of the intricacies of the method.  He was very accomplished.

It was a rainy, I didn’t have anything pressing, so I spent the next 45 minutes looking at and discussing the different saws he had; uninterrupted since no other customers had come in.  I ended up buying a couple of the saws he that had demonstrated were the best and was getting ready to go.

“You use chisels?” he probed

“Yes.”

“Are they sharp?”

“Sharp enough, do you sell chisels too?”

“No, … You know how to sharpen them?”

“I do OK.”

“Draw what you think is sharp”, as he slid a piece of paper and a pen across the counter.

I made marks similar the the drawing in Figure 1a.

“That’s not sharp”, he then drew the a drawing like Figure 2a.  “That is sharp”, while looking at me crossing his arms across his chest.

I took the bait. “what I drew is sharper than that.”

“Really?”, then he proceeded to lay out his case.  It was a good case too.SomethingSharp
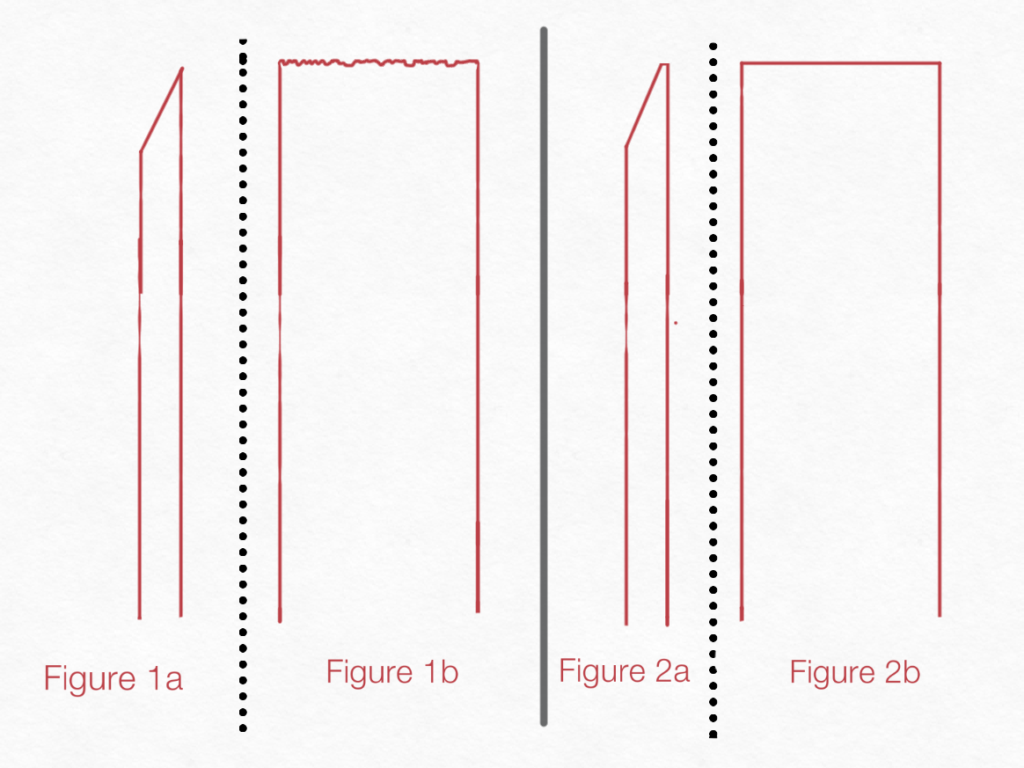
He started by pointing out that when sharpening a blade to a fine edge, as in Figure 1a, there comes a point when the metal is so thin it has no structural support.  In other words at the finest point where 2 planes of a piece of metal converge it is at places only 1 grain of metal thick and it is not consistent since even when using a very fine grit abrasive the grit of the abrasive is larger than the metal grains.  The product of this process, if looked at under extreme magnification would look like the drawing in Figure 1b, and the edge so thin it would be fragile.  While it would cut, or actually saw, and appear sharp it would dull quickly as some of the edge brakes off and other portions bend over.  If fact when we use a sharpening steel to sharpen a blade, we actually aren’t sharpening it, but realigning the metal at the edge. With this process it doesn’t take very long before the blade is dull beyond the point of recovery.

Polishing the back of a blade

Polishing the back of a blade

In reality what we want to produce when sharpening a blade is not 2 planes converging, but 2 planes coming very close to converging then being joined by a 3rd plane that is the minimum thickness to keep the 2 planes from converging while remaining to maintain the stability of the metal’s lattice structure.  This is best illustrated by the drawing in Figure 2a and the benefits and stability are illustrated by the drawing in Figure 2b.  When you are able to achieve this configuration on a blade, it will cut smooth and remain sharp.

Evidence that the back is flat

Evidence that the back is flat

Great theory, but how do you get there?  Well, he showed me and I’ll describe it as best I can, using a single bevel plane blade as an example.  This process works on bi-bevel blades such as knives too, but requires some adjustments in technique.

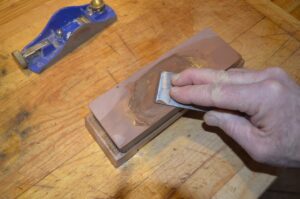
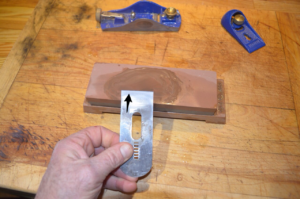
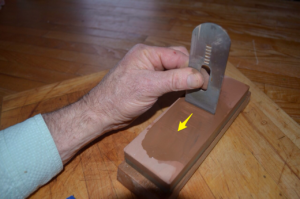
Start by polishing the back side of the plane blade first to insure that it is flat.  This is done by laying it back side down on a stone and working it until it has an even patina of abrasion from edge to edge.  Next you will work the bevel, to do this you will need a guide to maintain a perfect angle while sharpening, I don’t believe anyone is able to hold it freehand precisely enough to meet the goal of creating a precision edge.  Repeat this process, backside then front, until you are at the finest grit stone you will be sharpening with.  While working with the last grit on the bevel polish it until you raise a burr all along the back side of the blade, then take the blade while holding it with the point resting on the stone and drag it smoothly about 1 inch, you just made your 3rd plane.  Next, polish the bevel on the stone counting the strokes, checking for the burr to be raised again after each stroke.  Once you get a burr again, hold the blade with the point on the stone and duplicate the drag you did previously.  Now polish the blade one more time counting the strokes, but with 2 to 4 less strokes and you have a sharp blade that will maintain its edge.

Draw the blade back 1 inch

Draw the blade back 1 inch

A few details to be aware of:

  • Insure your stones are flat.  If you are using water stones they will develop a shape with use that you will need to addressed by flattening them.
  • Use a 3 point guide so the blade will define its own cant.

Lastly, its been about 20 years since I had this valuable encounter and over the years I lost the contact information of the man that educated me on sharpening.  I’ve tried to find this gentleman again unsuccessfully, but while writing this I searched one more time and I found him on the internet.  The shop’s name is Tashiro Hardware, LLC, of Seattle, Washington and the proprietors name is Frank Tashiro.  On his website tashirohardware.com he notes that he will be 93 in January of 2015 and It appears he is shutting up shop, but hopes to publish a manual on sharpening prior to shutting down his website.  As of this writing he hadn’t published the manual yet, but I hope he does. Based on the education I got in his shop in a couple of hours, having his knowledge preserved in a manual will greatly benefit anyone who is interested in maintaining a sharp blade.

On to Bend

I force myself to stay in the tent at least till dawn breaks; otherwise our schedules will be incompatible.  I have developed a specific routine to give Lori more time to sleep, while I start prepping for the days travels.  It’s a compromise, I generally get up very early and start my day, Lori would prefer to sleep in.  With this routine I’m not moving as fast as I’d like to be, but Lori is moving faster than she would normally, so we meet in the middle. Once coffee and tea is ready I wake Lori with a cup, it is just barely enough incentive to get her going.  After breakfast Lori showers while I start packing the bike so we can be off at a reasonable time, with that said we are rarely moving before 9 am.

It’s not a matter of just ride, ride, ride, but we’re trying to cover a lot of miles and if we want to have the leisure to stop, then we need to budget our time.  Unlike car travel, a 500 plus mile day is hard on a motorcycle, 350 mile days are what I like to plan for and 150–250 mile days provide opportunities to really see an area while traveling leisurely. Anyhow with these kinds of time/mileage constraints if we don’t start rolling till noon, we either aren’t going to get very far or we aren’t going to stop much.

Late last night a couple of motorcyclists pulled into the campsite across from ours.  While we were both packing this morning we visited a little bit, the basic questions; where are you going? Where have you been?  Turns out they had been riding around Yellowstone and were heading back home to Spokane; they were planning on taking a loop through northeastern Oregon but ran out of time.  Since they weren’t going to be able to ride through northeastern Oregon and we were, they offered to let us take their riding guide book on the area and mail it back to them latter.  We appreciated the offer but settled for letting Lori read through some of the routes so we could decide what route to take across Oregon.  Over the years we’ve grown somewhat accustomed to help and generosity from fellow riders, this is not an exception.  We wished each other safe travels and were both on our way within 5 minutes of each other.

I typically know where we want to end up at the end of the day, but don’t have a rigid plan of how we will get there.  Today we are going to start by heading towards Enterprise, Oregon on highway 129, which will take us through the Grande Ronde River Canyon.  I had hoped to make it through here last night and camp on the other side of the canyon, but we were worn out and the heat in the canyon would have been miserable.

It’s overcast, but the temperature is pleasant.  We cross the river to Clarkston, Washington and turn south on 129.  We ascend out of the out of the river bottom onto bench land covered in wheat fields that are being lit by the morning sun as it peeks through the clouds, the day is starting out wonderfully.  After about 20 miles we start the descent into an arm of Hells Canyon formed by the Grande Ronde River.  The road is tight twisties as it descends and ascends the canyon walls and there is no traffic, allowing for a pleasant spirited ride for about 20 miles.  Once on the other side of the canyon the terrain changes to rolling bench land with occasional views of the canyon to the east, it’s here just after you enter the Wallowa-Whitman National Forest that I would like to explore as a possible campsite in the future.

We get to Enterprise about 10:30, the coffee I made this morning wasn’t the best and we are ready for a break.  After riding around town a bit we find an establishment downtown named Gypsy Java, it looks interesting, we go in.  It’s kind of eclectic, lots of seemingly unrelated things around, furniture, games, books, art work, musical instruments, we like it.  We visit with the barista, probably the proprietor, as she gets our orders.  Slow, but excellent, the day is still beautiful and we take the handmade mugs outside to enjoy.

Suzuki V-strom

Suzuki V-strom

Our bike sits on the street fully loaded with our discarded riding gear draped over it.  It’s a dual sport motorcycle developed for adventure touring, a Suzuki DL-650 V-Strom.  All of our supplies for a two week trip are packed onto the motorcycle.  In the right side case are our clothes, the left side case contains our tent, sleeping bags and sleeping pads, the tank bag has our toiletries, electronics, and maps, the tank panniers carry water and tools; everything we need on our trip except food, which we buy as we go.  We have a topcase on the back of the bike for storing helmets and gear when we stop, but it is usually empty when we are riding; this helps maintain the proper weight distribution for riding.  I always enjoy riding into a campground filled with Assorted RV’s loaded with toys, towing other toys and am glad we don’t require as many things to enjoy traveling.

Adventure touring motorcycles are configured to be multifunctional, opposed to street racing or off road motorcycles, they are able to perform many tasks.  Some of the characteristics common to adventure touring motorcycles include an upright riding position, wider handle bars and suspension that is more compliant and has a greater range of travel; this allows them to more easily travel on both paved and unpaved surfaces.  Other than a few basic similarities individual makes can vary widely, from 400cc to 1200cc and from more dirt oriented to more street oriented.  In reality any motorcycle can be used for adventure travel, the most important element is a rider with a desire and the skills to make it happen.

The V-Strom is at the lower end of the price curve for a bike that is configured for adventure touring and able to easily ride 2 up.  The engine does seem to be working when we are droning down the interstate 2 up, but it is more than capable when riding the back roads, and we hate riding the interstate anyway.  It’s not a dirt bike by any means, most adventure touring bikes aren’t, but we have ridden many miles on dirt roads and jeep trails, a nice option when traveling.  Depending on how hard we ride we can go a little over 200 miles before we need to fuel up, and when there is a need we can ride easy and get 250 miles out of it.

The sun was breaking through the clouds in a few places to the east, but we were heading west towards an incoming front.  We weren’t out of Enterprise more than 30 miles on highway 82 before we started feeling the change in the weather, the winds became strong out of the southwest producing a headwind as we got closer to La Grande.  By the time we reached La Grande we needed fuel and a rest from the weather.

I realized this was going to be a hard day of riding.  I wanted to make Bend, Oregon before stopping which was at this point about 300 more miles; it was already 12:30, considering the roads probably 6 more hours of riding.  The fuel break turned into and hour, early in a trip there is no such thing a s quick stop, we are still getting into the routine.

The winds were not as big a factor after we left La Grande, but the temperature continued to drop for the rest of the day and we rode through a few rain squalls.  The roads were good; I’ve ridden through northeast Oregon a number of times and have yet to find a bad road, apparently I’m not the only one who thinks so, local stores in the area have printed up a motorcycle touring map they give out.  We picked up 244 to Ukiah and from there we headed towards Heppner.

From Heppner we took Hwy 207 south to Mitchell. We needed fuel and  Mitchell is not much of a town; at one time been prosperous but not anymore. Mitchell is just east of the John Day Fossil beds National Monument on Hwy 26, I’d guess that much of their business comes from motorcyclist on day rides from Bend, enjoying the twisties through the canyon.   None the less there was an old gas station, with not quite antique pumps.  It didn’t look open, but as we rode up the attendant walked out from behind the building to fuel us.  Oregon passed a law that doesn’t allow for self service fuel pumps, but it does exempt motorcyclist as long as an attendant starts the pump for them.  Fortunately we had cash in small bills, the operation didn’t take credit cards and for a cash drawer there was an assortment of change spread out across the top of the gas pump.  We kind of have to envy the ability for a business man to be able to say “the hell with modernization I’m gonna run it this way”.

We are both pretty worn out by this time, every so often the sun peeks through the clouds giving the hope that it will warm up; the hope is false.  We are about 100 miles from Bend and there are two towns that may have lodging before we get there, Prineville and Redmond.  I do a quick search on my phone to see if there are any decent lodging prices and find none.  We will push on to Bend.

There is a State Park campground just north of bend on the Deschutes River called Tumalo, we’ve stayed there in the past.  The State Parks in Oregon are nice; many have options besides tent camping such as yurts, tepees or log cabins which we have used in the past.  We were both chilled as we pulled into Tumalo State Park.  In our rush to get here we didn’t stop to put on heated gear as it cooled off.  After hours of riding in falling temperatures you lose a lot of heat from your body and I have to say apparently we don’t learn very quickly because this happens once about every trip.  I had hoped one of the yurts would be available, they have heaters and we would be able to warm up, but there weren’t. The price had also gone up, last year the yurts rented for $27 per night and now they were $39.

I looked up hotels and found some that started at $35, so we went into town and got one.  I use an app on my phone called “Hotel Price Compare”, it looks at 30 different hotel booking sites for last minute deals, it came up with a good one at $42.  While checking in the front desk attendant said the price would be $52, I told him it was advertised at $42 and he said that was for 1 person.  I was too tired and cold to argue or go somewhere else so we checked in.

We immediately turned up the heat, got out of our wet clothes then took hot showers to get the heat back in our bodies.  While Lori was showering I went across the street and got a Pizza and a bottle of wine and we were done for the night, all is good.

Tomorrow our pace changes.

Fresh Mozzarella

Why make mozzarella? Partly because I can, the simple gratification of knowing how to take raw ingredients and create a finished product I can eat. There is more to it than that though, a gratifying sense of self sufficiency, escape from reliance on mass produced food, a break from vocation, a task that has an inherent value unto itself, a simple rejection of the societal norm of immediate gratification, an embrace of the quality provided by slowing down and doing something important. Once I understand a process I can better appreciate the subtleties presented by an artisan of the craft, I can make changes, I can make it mine. It could be that Friday night is pizza night and I need mozzarella.

The finished product

The finished product

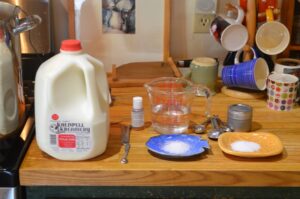
It doesn’t really matter the reason it’s easy to make and takes about 20 minutes. In its basic form it takes 3 ingredients, milk, citric acid and rennet.

Almost any milk will do, with the exception of ultra-pasteurized milk which is becoming more commonly available due to extended shelf life. During the process of ultra-pasteurization the milk is heated to a high temperature, which affects the proteins so they won’t form proper curds. I am using a gallon of whole milk and I will get about a little more than a pint of cheese.

Ingredients

Ingredients

Citric acid can be purchased in a granular form, this is sometimes referred to as sour salt. This is a refined product that allows you to easily measure a quantity that will give you the proper pH. There are other sources of citric acid such as lemon juice that could be used, but due to varying concentrations of citric acid the additions would have to be managed by testing the resulting pH 5.4 – 5.6 after the addition of the juice. The acid promotes separation of the solids in the milk. In this recipe I am using 1 ½ teaspoons of citric acid dissolved in 1 cup of water.

The last ingredient that is needed is rennet. Rennet is and enzyme used in cheese making that promotes the bonding of the curds. It comes as animal or vegetable rennet, the animal rennet was the original derivation and was extracted from a calf or goat, vegetable rennet is processed form molds. It comes in liquid or tablet form, while the tablets are more common the liquid form is easier to use and measure accurately. The conversion is 1 rennet tablet is equal to 1 teaspoon of liquid rennet, unless it is extra strength liquid rennet in which case it is cut in half. I am using extra strength rennet, so for a gallon of milk I need 1/8 teaspoon, if you were using tablets you would need ¼ tablet.

The tools needed to make the cheese using a gallon of milk include:

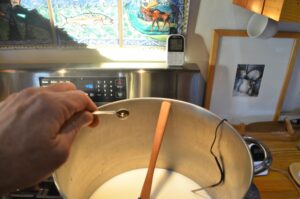
adding rennet

adding rennet

  • A pot that will hold at least 6 quarts, larger is preferred, I am using a 5 gal stock pot.
  • A thermometer to measure the temperature of the milk, I am using a digital thermometer attached to a meat probe that I hang over the top of the pot.
  • A slotted spoon or colander for removing the curds from the whey.
  • A microwaveable bowl that will hold at least a quart.
  • A pair of spoons or rubber gloves for stretching the cheese.
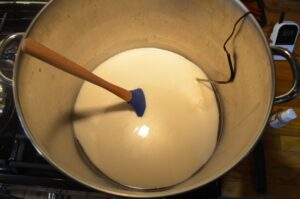
curds pulling away from the pot

curds pulling away from the pot

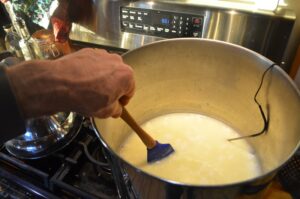
Start by pouring the cold milk into the pot, then while agitating it slowly mix in the citric acid dissolved in water. Heat the milk and acid mixture, stirring occasionally to prevent scalding, to 88 degrees. Add the rennet when you achieve 88 degrees while stirring gently to ensure it is well mixed, about 30 seconds, then discontinue stirring to allow the curds to form. Continue heating to 105 degrees, as the mixture heats you will notice the curds start to form and pull away from the side of the pot. Once you hit 105 degrees the curd should have formed, stir gently for about 30 seconds and turn off the heat. I let it rest for about 10 minutes.

giving the curds a stir

giving the curds a stir

Things to watch for:

  • This process doesn’t take very long, it takes about 10 minutes to get to 88 degrees at medium meat.
  • If your thermometer is in the middle where your curds form first, the curds may insulate it, resulting in a delay in reading 105 degrees. You may get a more accurate reading at the side of the pot.
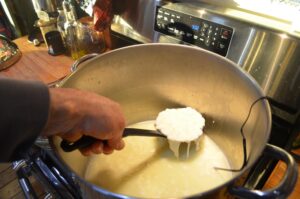
removing the curds

removing the curds

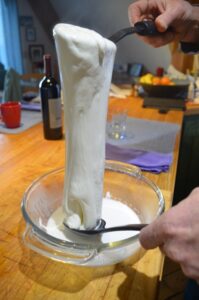
Once the mixture is rested, you can separate the curds from the whey. You can use a spoon with drain holes in it as I show in the picture and place the curds in a microwaveable bowl, but I prefer to slowly pour the whey into a colander allowing most of the curds to go in last. If you are using a bowl, once the all the curds have been transferred you can pour off the excess whey while holding the curds in the bowl with a spoon. If you are using a colander tilt the colander on its side and roll the curds around it till you remove most of the whey. Don’t try to get all the whey out or press the curds too hard, you will end up making the cheese to hard.

stretching the cheese

stretching the cheese

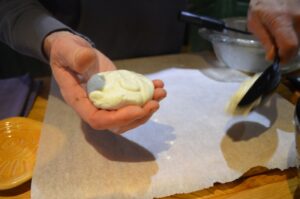
The next step is to put the curds in a microwavable bowl if you haven’t already and put them in the microwave for 1 minute. Take the bowl out of the microwave and use two spoons to lift the cheese and fold it over on itself stretching it as you do. Once the cheese drops much below 135 degrees and it doesn’t stretch very well, place it back in the microwave for 30 seconds. During this second stretching I add the salt, 1 to 2 teaspoon seems to bring out the flavors well. Sprinkle the salt across the top of the cheese and fold it in. As it cools this time I quit using the spoons and start shaping the cheese with my hands by folding it onto itself without stretching it much, it’s still going to be hot enough to fuse together if you give it some time. Once you are ready to maintain the shape you have made you can dip it in cold water.

enjoy

enjoy

Try a piece of your warm cheese now and if you don’t eat it all you can make a pizza with the rest.

LED Cable Lighting Project

I have been wanting to change the lighting in my house to LED lights. To do it there are a couple of options, replace the standard bulbs with LED conversion bulbs or change the fixtures to low voltage fixtures designed for LEDs, both of which are relatively expensive.  Changing the bulbs in my current fixtures is the simplest method, but I would end up paying a higher cost for the bulbs and wouldn’t get some of the lighting benefits available from standard LED bulbs.  Replacing all of the fixtures with fixtures designed for LEDs would allow access to the lower prices bulbs and the more flexibility, but would entail more work and the purchase of the fixtures which seem to be sold at a premium price .

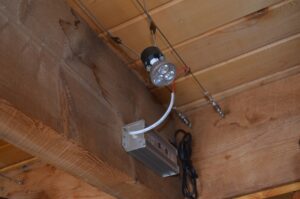
Lights installed in my kitchen

Lights installed in my kitchen

These issues led me to evaluate building a system from available parts, which it turns out are relatively inexpensive.  The parts I needed to make this functional in my home were a support structure, a 12 volt power supply and a fixture to connect the bulb to the system.

Cable and Transformer

Cable and Transformer

For the support system I used 3/32″ steel cable which could be stretched with turn buckles and strung in parallel runs where I wanted the lighting.  Since the lighting is low voltage there is no hazard running the current through the uninsulated cable.  I attached the cable to the ceiling or walls with eye bolts and maintained a 4″ spacing between the Parallel runs.

For the Power supply I was able to find 80 watt 12 volt transformers for each circuit.  These are available online for between $12 and $40 dollars apiece with many different wattage outputs.  I chose the 80 watt since it allowed me to place about 10 lights on a circuit with a 20 watt buffer.  I connected the power supply leads to the cables with split nuts.

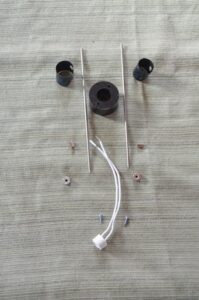
Light Fixture parts, ready for assembly.

Light Fixture parts, ready for assembly.

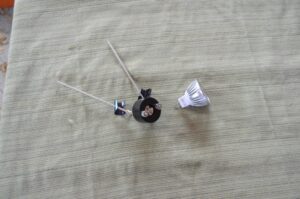
The light fixtures took a little more work.  I wanted a fixture that looked good, was easily adjustable and could accommodate different light bulbs based on my needs.  The bulb I choose was an MR16 bi-pin bulb, since they come in spots, floods and different light spectrum outputs.

The raw parts I used for the fixtures were as follows:

  • 1/8″ Stainless Steel TIG rod for the fixture extensions, this comes in 3′ lengths and cost about $1.25 per stick.
  • 1 1/2″ machinable plastic rod for the insulator, it comes in 1′ sticks for $6.00.
  • MR-16 Lamp holders, 11 in the pack for $5.00
  • 1/8″ shaft collars, $1.50 each
  • #4 X 3/8″ screws, $0.03 each.
  • 10-12 Parallel crimp connectors, $3.00 per package of 20.
  • The spring out of a broken tape measure to be fashioned into a retaining clip.
  • 6 watt 500 lumen MR 16 LED Floods, $5.00 each.

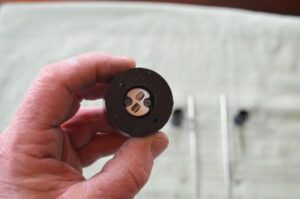
I started making the insulator by cutting the plastic rod into 7/8″ long pieces, then using a 1/2″ Forstner bit to drill a hole in the center of the plastic disk 7/16″ deep.  Then I used a  9/32″ bit to drill the rest of the way through the disk.  I finished the insulator by drilling an 9/64″ hole on each side of the disk.

Insulator with Lamp holder installed

Insulator with Lamp holder installed

At this point the lamp holder will fit into the hole in the insulator that was made by the Forstner bit and the wiring will go through the 9/32″ hole.  I used 2 – #4 X 3/8″ screws to fasten the lamp holder to the insulator.

I cut 2 pieces of 1/8″ stainless steel rod 7″ long and rounded the ends on a grinder.

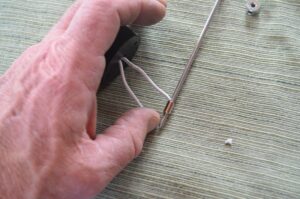
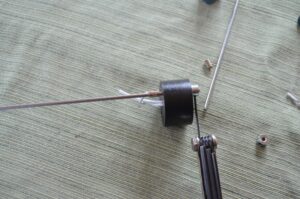
I left about 2″ of wire on the lamp holder and striped it baring about 3/8″ of wire.  Then fed the striped piece of wire into the 10-12 Parallel crimp connector and forced the 7″ long stainless steel rode in after it.  Depending on the brand of connector this may be a good tight fit, but on some connectors it is loose.

Sliding rod into connector with striped wire

Sliding rod into connector with striped wire

The rod is then slide through one of the 9/64″ holes in the insulator and a 1/8″ shaft collar is used to secure it.  The same process was used for the other rod and wire.  Once both rods and wires were connected I secured the wires by crimping.  I finished with the rods by bending them away from each other until the span between them was approximately 5″ at the top.

Securing shaft collar to rod

Securing shaft collar to rod

The last thing necessary prior to plugging in the bulb was to make the retaining clips.  These were made from the spring out of a broken tape measure.  The spring cuts easily with a pair of tin snips, so I cut it into pieces about 2″ long and dog eared the corners so they wouldn’t be so sharp.  The tricky part is putting the holes in them so they will go over the rods.  If you try to drill them, they will break and may cut you in the process.  The way I found to get the holes in them was with an old paper hole punch.  It has to be one that can handle a pretty large stack of paper to have the right configuration.  Once I found one that would work, making the holes was easy.  I put a hole in each end of the clip.

Assembled lamp and bulb

Assembled lamp and bulb

The clips will be shaped like a “C” since they are spring steel, I slid the rod through the hole in the top of the “C”.  Place the rods between the cables and bend the clip over the cable so it is trapped between the rod and the clip, then slip the second hole in the clip over the top of the rod.  To adjust just squeeze the clip together and slide it up or down.

Creative cabling to get light where I wanted it

Creative cabling to get light where I wanted it

Close up of a light

Close up of a light

Longer rods

Longer rods

Motorcycle Travel and the Beginning of a Trip

Wind, speed, passing cars, the drone of the engine, a monotonous ribbon of lined concrete passing through a familiar landscape. So many times I have come this way.

Silence from my companion.

This is how it always starts. We left latter than I had hoped, as usual, probably the unconscious result of a struggle for control. Push, push, go, go escape. We aren’t the same, I am results oriented, Lori is a planner. Left on my own I’d get where I was going on schedule without enjoying it and she would get there whenever, but would experience the details of the journey. In the end the combination of personalities works well, but at the beginning of a trip it takes some time to adjust to the new rhythms for both of us.

It doesn’t help that it is a long way to a point where the act of travel departs from the routine and the excitement of new experiences begin. In reality new experiences can begin anytime your mind is open to them, but mine usually isn’t at the beginning of a trip. Going anyplace in Montana requires a good distance of travel, and travel is part of my working routine. For me, time off and the ability to acclimate to time off is benefited by a change of environment. I don’t consider myself uptight, but I am. People who know me well see it, acquaintances generally don’t. Lori lives with it and is unsure as to whether I ever chill out.

Stopping and living in the moment is what travel is about, but I have trouble in the beginning. We got a late start by my designs which means we have to make time, we actually don’t but I have a schedule. We stop in Deer Lodge for fuel after an hour and a half in the saddle. There hasn’t been much for conversation. Lori has a headache and needs to pee, I fuel up. Fifteen minutes break, moving again.

It started out chilly this morning, about 55 degrees, but sunny with scattered clouds. The light is flat as we ride through a landscape that invites travelers, while we press on with only the intent of moving through it. The miles have been uneventful as I try to focus on the task of riding, becoming aware of our surroundings and giving the task the attention it deserves. Distractions keep intruding; did I leave enough instructions for the house sitter, are my task at work finished, what am I going to come back to. I struggle to start living in the present, it won’t happen today.

We make Missoula by 12:30 and stop for lunch. Three hours is good time if you’re trying to be efficient, but making that kind of time from Bozeman to Missoula requires you travel along I-90. I drive this regularly; unfortunately there aren’t a lot of other options unless you are planning to see Montana, then you will need to make them. We’re not interested in spending time in Montana on this trip since we do it regularly, some of it as part of my job. Even with extra time there are not a lot of alternatives for the travel between Bozeman and Missoula that are direct, the mountains get in the way. If you want to ride paved routes you can contrive them along highway 200 by way of Helena or by piecing your way though Virginia City and into Darby then up Highway 93. You would have to plan for between 4.5 and 6 hours compared to 3 on the interstate. If you don’t need to get anywhere and you can ride dirt, then you have more options.

We stopped at Quiznos for lunch. Fast food and chains are never a preference and are usually avoided, but I’m want to move on.  Once stopped it always takes longer than I think it should. Even though we made good time to Missoula, our lunch break took an hour and a half so the time gained was lost at the stop. Its early in the trip and I’m not yet able to enjoy the moment, even though the weather has become nearly perfect for lunch in the sun.

We leave Missoula on highway 12 which goes over Lolo pass then down the Lochsa River. In the back of my mind I hope to get to a place on the Wallowa-Whitman National Forest about 30 miles North of Enterprise Oregon to camp. I’ve ridden by this area in the past and it appears that if you were to pull off on one of the Forest roads a little ways you could find a place to camp that would allow you to wake up to the sun rise over Hells Canyon. Of course it doesn’t hurt that camping in the national forest is free.

Going over Lolo Pass I finally feel I am leaving the routine and open to new possibilities, encounters and experiences.

Highway 12 is a great road if there isn’t a lot of traffic and today it is a great road, especially on a motorcycle. The road corridor follows the wild and scenic Lochsa River through its canyon. The temperature is rising as we descend down the river canyon, it’s in the high 70’s but it would be much higher if they weren’t moderated by the river. The canyon is fairly narrow and so the road is curvy, a good thing on a motorcycle.

A rest on the Lochsa

A rest on the Lochsa

Since I’ve loosened up a little bit we have started to communicate more. We have communication devices that are attached to our helmets that allow us to talk as we ride. We don’t talk much as a rule, but share observations, plans and needs. Not all motorcyclists like the communications systems, for some part of the pleasure is the time alone in your head even when traveling with a companion. For me being able to talk to Lori reduces potential frustration when we are trying to make decisions on the fly and allows us to share observations that we can reflect on and enjoy later.

In general with or without communications traveling with a companion on a motorcycle is an intimate experience. The intimacy is derived from the close physical contact on the motorcycle seat, the coordination required to perform the task of riding proficiently, and a shared experience. The person on the back is referred to as a pillion. Riding pillion is not a passive act; the pillion affects the way the bike handles especially when the riding is spirited. With a good pillion and  pilot the bike can perform at a high level, while both parties get satisfaction from the riding experience. Lori has become a good pillion.

When we started motorcycle touring, gas prices were high, our money was short and the motorcycle seemed like a tool that would give us more opportunity to travel. We weren’t expecting the other experiences it has made available. Motorcycle travel is not just another way to be transported but an experience of its own.

Unlike traveling in a car, you are part of the environment, if it’s cold your cold, if it’s wet your wet, and then sometimes, it’s perfect. Even though perfect is nice, cold & wet or any other condition lends itself to the experience as well.  Some of our best stops have been during adverse conditions creating serendipitous experiences in the moment. It’s not just about the conditions but an experience of the senses as you ride, you feel the wind and smell your surroundings, riding by an onion field you sense the fields, the smell of the fresh tilled earth, the sweet onions that have just been harvested, as you hear and see birds along the marshes beside the fields. True it’s not as intimate as riding a bike or walking, but you can’t cover 4000 miles in 2 weeks riding a bike or walking. You are consciously living in the moment, not just processing time prior to arrival at your destination.

The interstate systems have created a homogenous landscape dominated by the ubiquitous chains of fuel, food and lodging at exits.  They provide a fast efficient route of travel across the country at the expense of culture. In general my preference is to travel the back roads and alternate routes across the country, not only are they more pleasant riding, but they allow you to experience the local culture as it has developed to support the needs of a community.

For us stopping is as much a part of motorcycle travel as the riding itself. We are always looking for places that are creative or unique, be they food related or cultural, to stop, rest and catch up on conversation. Along with the mandatory reasons for stopping we stop as a break from the physical environment, which when it is challenging can increase the appreciation of the stop.

On one trip we rode into an unexpected snow storm, furthermore we had just come over a mountain pass and were severely chilled, this was before we had heated gear, as we came into a little town we stopped at a coffee house/bookstore with a fireplace to warm up. Once inside and out of our riding clothes in front of the fire, we spent the next hour warming up and enjoying coffee while visiting with the locals. This establishment was not Starbucks or one of their many competitors, but what chains do their best to emulate and sell. This is the real thing, and we wouldn’t have found and experienced it except that we were cold, conditions were bad and we needed to warm up. What we found was a piece of real culture, something many businesses try to sell today; they are poor imitations once you have experienced the real thing. The problem with these types of experiences is that once you have experienced something real, there is no being satisfied with an imitation.  Hence the need to keep riding and looking, finding those things that are real in society, people who do what they do because they care.  In the end that is what travel is about.

For me travel goes beyond the physical environment and is a conduit to ideas and cultures, hopefully an opportunity to increase my awareness of the conditions and needs of other peoples so I can be part of the changing world. It is a mindset and really only requires openness, be it for an hour, a day or a week.

As we transitioned from the Lochsa River drainage to the Clearwater River drainage on Highway 12 the road changes from what we call twisties to sweepers and the valley gets broader resulting in an increase in the temperature. Twisties and sweepers refer to the types of curves in the road; sweepers are long gently curves whereas twisties refer to tight turns where one follows another. The increasing temperature is a problem for us, our ideal riding temperatures are between 50 degrees and 85 degrees Fahrenheit, and if there is a choice when riding outside of that range I would choose lower temps as long as there is no ice.

By 5:30 and we are about 20 miles from Lewiston Idaho, the temperature is nearing 100 degrees Fahrenheit, there is no cooling from the hot wind. The heat is sucking the energy out of our bodies and as we get closer to Lewiston the temperature continues to rise. By this time it is obvious that we aren’t going to make it farther than Lewiston today and we will have to stop. Its 102 degrees as I stop on the outskirts of Lewiston to check my hotel finder app on my smart phone to see if there are any cheap hotels available. This is a copout, I had planned to camp, but we are both miserably hot and the idea of air conditioning is an alluring siren. While sweating in my gear on the side of the road the app dashes my hopes of cheap hotel lodging and we head to the Hells Gate State Park Campground at the entrance to Hells Canyon south of town. Lack of options kept us honest to our budget and plans. We had planned to camp most of the trip, both to reduce expenses and to maintain contact with the environment. There are only rare occasions where a hotel room is actually part of the culture or environment of a place.

We had a simple dinner of chips, humus, salami and a box of wine while we relaxed, glad that we had been forced to camp.

Reminiscing about French Markets

In October of 2013 we went to France.

The food is what I most miss. Not the stuff at restaurants, yes there are good restaurants in France but good restaurants can be found anywhere. When I talk about the food in France I’m talking about what is available in the markets. I hadn’t realized how limited our selection is in the U.S.

France is a pastoral country, once outside the cities and villages the countryside is covered by small farms. As you walk around the farms you can imagine that this is ground that has been farmed for over 1000 years and it has.  While there are industrial farms, many of the farms are managed traditionally, to meet the french demand for locally produced high quality products.

In France markets are still a part of life.  In the smaller towns and villages they have market days once a week in the larger cities they have them every day.  The markets along with specialty shops are where much of our food was purchased.

The food we bought at the markets and prepared was some of the simplest cooking I have done and it tasted great.  Of course, if you start with good food you get good food and as a bonus while shopping at a french market you get a feast for the eyes.